BMW motorcycle battery testing, removal, trickle charging and jump starting. |
|
This page is about BMW motorcycle batteries, but applies to most lead acid batteries.Which cable should be removed first?A lead acid battery can produce hydrogen gas. It is extremely explosive. One must use procedures to insure safe operation around a battery. Here are a few tips. All current drawing devices (ignition, lights etc) should always be turned off before trying to disconnect a battery. One wants no current flow to assure that there is no spark as a cable is lifted off. A circuit malfunction may exist and be drawing current all of the time. There is no easy way to know that without having the cable disconnected. If one removes the positive (ungrounded) cable first and accidentally allows the tool to touch a ground, sparks will fly. If some circuit is drawing current, then a spark can occur. For that reason it is best to always first remove the cable that is grounded and that is usually the negative one. If one wants to go further, remove it at the ground end, not the battery end. Any spark will then be away from the potentially explosive gasses of the battery. Remove the negative first and attach it last. Connecting the charger is also dangerous. I suggest connecting it while the charger is unplugged and/or turned off. I like to flash the two clamps together first to see that they don't spark. I have been surprised more than once in 45 years of doing this. Don't worry, at least with the older analog type charger, you won't damage it by a fast flash. On the new "smart chargers" one would damage the electronics. Check the clamps once they are on the battery terminals by wiggling them a bit before turning the charger on. If your charger has a lower setting, always use it first to check for a low current flow. I like to start with the Variac set at zero. Frequent battery inspectionThis one is simple. Inspect the terminal connections for corrosion and frayed wires. Make sure that it is fastened down securely. Take a look at the level of the acid. Do not allow the acid level to be above the line or the plate. If the acid level is too high the battery has a greater chance to boil over and onto the frame. I highly recommend using dielectric grease on the terminals. Any type of grease is better than dry. Vaseline would work well too. Battery removal, /2 (late 55 thru 69)Remove the air cleaner, wide rubber battery strap and the wires. The battery strap can be a pain to remove. Grab it from above and one hand on each side of the strap and push down. The battery will come out forwards and to the left easily. The battery in the early Earles fork bikes was 90 X 80 X 162 mm. In mid 57, for the USA only, it was upgraded to 120 X 90 X 165 mm high. At that same time, many other changes were made for that series. Battery removal, /5, /6 and /7 (1970-80)Generally the battery comes out the top. Don't waste the time to remove the air cleaner and associated parts. The two bolts holding the rear frame section onto the main frame section may need to be loosened or removed for the larger battery on the LWB models. Trickle charge your BMW batteryAt my age I know a lot about trickles, and something about BMW motorcycle battery trickle chargers too. The only difference between a trickle charger and a BIG ASS CHARGER is it's charge voltage while under load. With a higher charge voltage, the battery will draw a higher current. It is the charger's ability to deliver that larger current that makes it a BIG ASS CHARGER. A charger that has a high voltage, but no capacity to deliver the current, quickly has it's voltage drawn down to a smaller amount and little current. It is easy and safe to buy a trickle charger designed for a motorcycle battery. They seem to cost as much as a car charger. Why is that? Why waste the money? I bet that you already have a charger. One of my tricks is to use any charger, of any capacity, to trickle charge. With all of the new exciting technology we can now go to a flea market and buy the once expensive "old stuff", for nothing. I use a variable transformer, called a Variac, to adjust the mains voltage that the charger plugs into. Normally you are stuck with whatever is available at the wall outlet. A Variac will use the "wall voltage" and adjust it to any amount from 130 down to nothing. If you have a charger with an ammeter that you trust, you can use it to trickle charge. Here is how I do it.
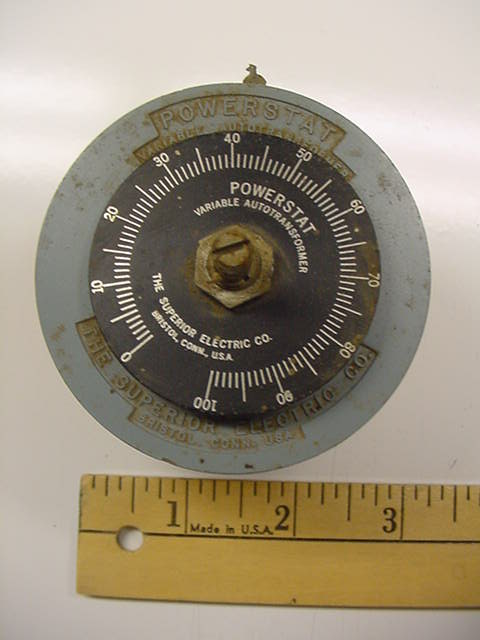
This is a very small Variac, but plenty large enough for using to adjust the current on a typical 6 amp charger. This one came out of some type of electronic equipment and needs to be wired up to work. I usually get these for $1.
The side view showing the connections for input and output.
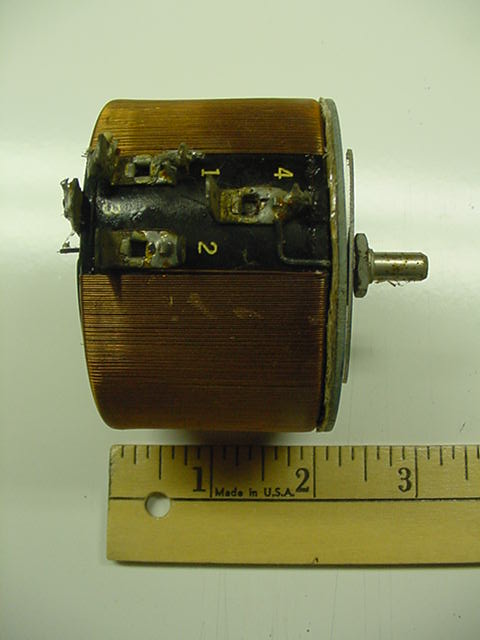
This is the back of the Variac. The legend shows which lugs are for what and the capacity of 1.75 amps. That is at 117 VAC or about 200 total watts. See the three lugs on the right side? They connect to the ends of the circular wound transformer. At the left side is the wiper (adjustable part) that makes connection to the various windings. Make sure that you find no broken wires on the transformer, as that is about all that can go wrong with this type of transformer. This type of Variac needs to be mounted on something to protect it from shorting out on something. I use whatever box I have laying around. I found these are really useful if the charger has room to mount this small Variac inside of it.
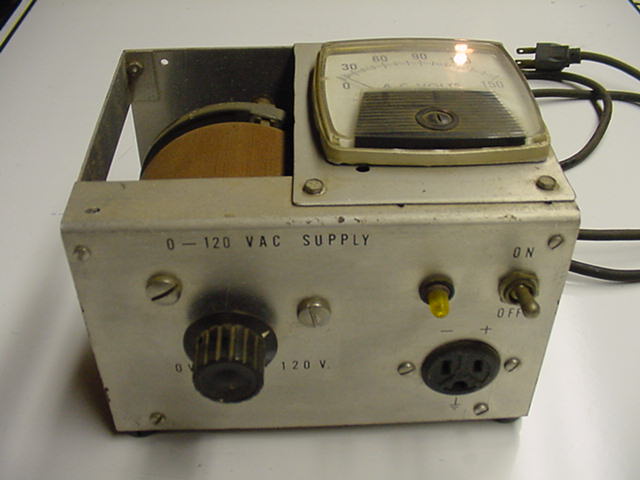
This is a slightly larger Variac that I mounted in a sort of box with a switch, AC meter and an outlet for the charger to use. I use this one for general electronic work that may require anything from 0 to 130 VAC. This means that I can take the wall voltage, about 120 volts AC, and increase it slightly or decrease it to zero.
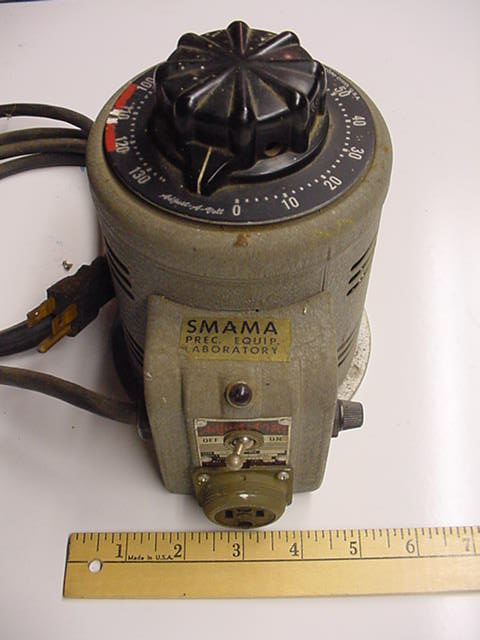
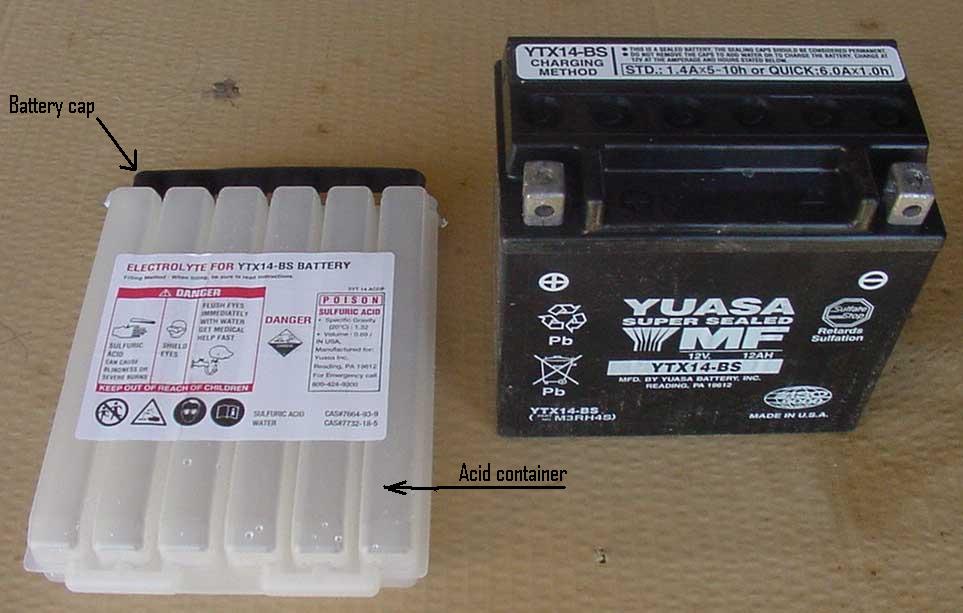
This is probably the best deal for a trickle charger. It is commercially made. It has the cord, a somewhat calibrated dial, on/off switch, fuse, outlet for the variable voltage and an "on light". This one is 10 amps, much larger than needed, but is very convenient to use. It is ready to go. It is also more expensive and heavy. Plug the Variac into the wall. Plug the charger into the Variac. The charger should have an ammeter built in or one should be added to one of the wires going to the battery. Attach the charger wires to the battery. Adjust the current reading on the charger by turning the big knob on the Variac. That's it. It is really easy. The enemy of charging is heat. Go back in an hour and put your hand against the side of the battery. You should not feel more than a few degrees of temperature increase. A trickle charge will take 24 hours or so. Again check the battery temperature. It may feel slightly warmer than before, but only very slightly. If the battery is hot, then you know that it was being overcharged. A slower charge is safer and will help the battery life too. A normal charge rate is 10%. For a typical BMW battery of 20 amp hour rating, that would be a charge of 2 amps. After 12-24 hours you should see that the current has tapered off to less than one amp. The battery is charged up to its capacity. To trickle charge it, use even less current. I would suggest about 1/2 amp for at least 24 hours. The current won't taper off so much with a trickle charge. The reason is that even with a full charge, a battery will continue to take a small amount of current. The idea is to start with a current somewhat above that minimum current and let it taper down slowly. An old 20 amp battery no longer is a 20 amp battery. The capacity start decreasing on the first charge. It tapers off slowly to the point that it no longer will crank the starter. It may now be a 5 amp battery. To charge it at 10% would mean 1/2 amp. Your old used battery is of an unknown capacity and it is better to charge it at less than the original amount. I actually use this Variac method more often to charge bike batteries at the normal rate. A charger for a car can easily over charge a smaller battery. With a Variac, I can adjust it to whatever I want. Variacs are available in much larger sizes too, some weigh 100 lbs. Some are for 240 VAC, so check it before buying. For three phase power they stack three on the same shaft, one for each phase. An example of filling and charging a new BMW motorcycle battery.This battery is for a /2 that is getting converted to 12 volts with the MZ-B kit. It just barely fits into the space for a battery on the /2 twin. This battery came with the acid in a container specially designed to allow easy filling of the battery.
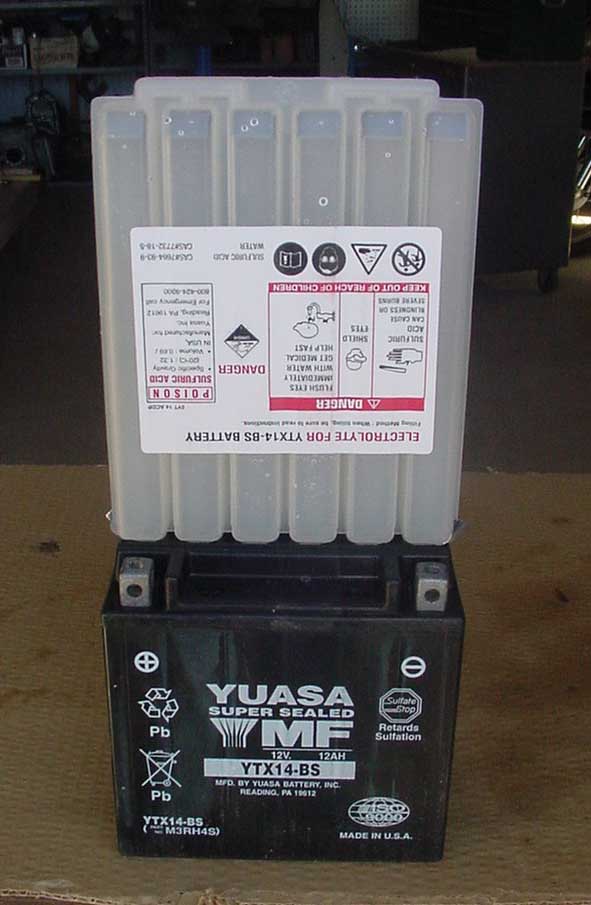
This shows the battery and acid container.The black plastic cap is removed and kept. It does not seal the acid in the container. The acid is sealed in with a piece of metal tape. Then I set the acid container on top of the battery and push it down. The battery has a knife in each cell that automatically punches a hole in the acid container. Now the acid starts draining into the cells. It will take several minutes for it to all drain into the battery case. This is really clean and simple when compared to the old way of doing it. The chance of acid spills and damage are greatly reduced. I have done this twice just recently and not one drop of acid was dripped onto my workbench.
The acid has drained in and the battery is now full. At that point the voltage measured 12 volts and was climbing all by itself.
The "setup" for charging a batteryWith the acid added to the battery it started heating up. That is normal, so don't worry about it. One "should" let it set for a couple of hours to cool off before starting the charge. In this case it was late evening and I wanted it to charge overnight and be ready for use in the morning. I decided to start charging it at that time. Charging also heats up a battery. If I had started the charge at the usual 10% of the amp hour rating of 12 amps, my charge of 1.2 amps "could" have added enough heat to make it hotter than desired. Put your hand on a battery that has been filled for 10-15 minutes, it is quite hot. You don't ever want your charging to make it that hot. Now is where the Variac comes in. I am using the homemade one shown above. I just adjusted the Variac to provide the charger with just enough voltage to give me the desired charge current. I decided to charge it at about 1/2 amp. That is a really low trickle, but enough to charge it up. It is far better to charge a battery slowly than at a fast rate.
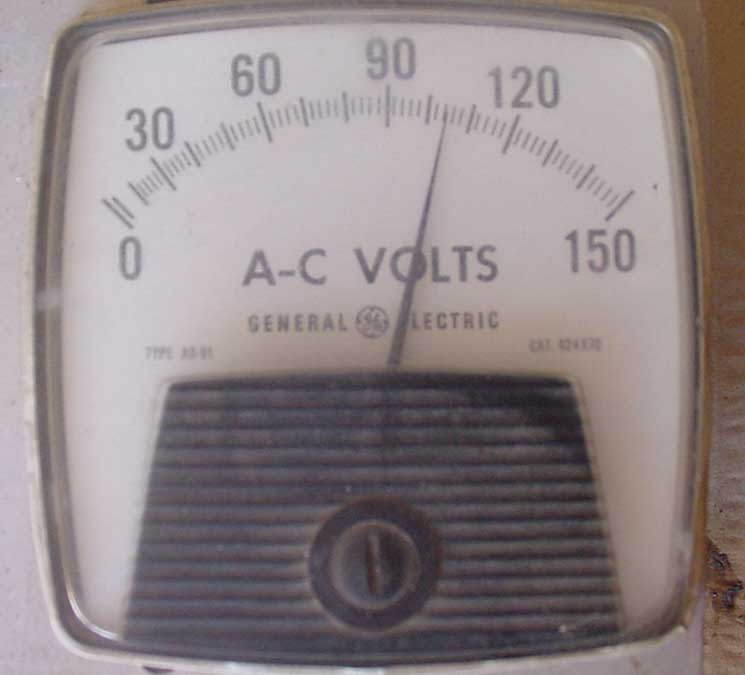
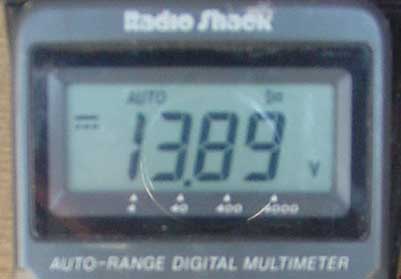
This shows the output voltage of the Variac. I really have no interest in the fact that it is 104 volts, only that I get the desired charging current. Within one hour the charge voltage had risen to 12.48. In the morning I found that the current had dropped to .3 amps and the charge voltage had risen to 13.89 shown below. That could sound like it is not fully charged up, so I increased the charge current to about .6 amps and that required a voltage of 14.2. That showed me that the battery was fully charged. I arrived at the .6 amps by knowing that if I had used the 10% rule to fully charge it, the current would drop to about 1/2 of the starting current, or .6 amps. What I am trying to say is that I wanted to safely charge the battery overnight. I didn't want to risk overheating it, so I lowered the charge rate to just less than 1/2 of the standard 10%. By morning it had fully charged. My final charge voltage.Fake marketingI have always gotten a kick out of the advertising on chargers saying that they are engineered to automatically adjust the voltage down to meet the need. That is crap. They have no choice in the matter. As the voltage on the battery goes up, the amount of difference is less and so is the current. They didn't engineer it, they were limited by physics. A totally natural limit is advertised as some "valuable thing" that only they have. Now, recently, some new games are being played with chargers, but that is recent and doesn't apply to the older simple transformer types. They might be called "smart chargers" or "battery tenders" or some such. These automatically stop charging when the battery reaches some predetermined voltage. When the internal leakage drops the voltage down again, it starts charging again. That is fine only if the charger is made for that type and size of battery. With the current variety of batteries and types, we would need several of these expensive chargers to fulfill the needs. The amp hour rating is only when new. As the battery ages, it is losing its rating. When it drops below the requirement, that is when it won't start. It is up to you to control the requirement. An engine in good tune will require less cranking. A starter with good bushings will deliver more energy with a lower current draw. If your bike is in poor tune with, has a starter with sloppy bushings and has an old battery, it can easily fail to start. Of course the battery could have a dramatic failure, but in general they are on a gradual downhill slide from new. Batteries are dangerousIf one charges at too high (the original 10%) of rate, the battery can overheat. The heat can warp the plates. The warping can cause them to break or short out. The gas in the case is oxygen and hydrogen, or the two parts of water. They are in the perfect ratio to ignite. They are contained in the case and we call that a "bomb".
I recently found this picture of the exploded battery,. It happened in 1992 in my (ham shack) radio room. What you see in the center of the picture is the exploded battery sitting in a plastic pan. The top is in another pan off to the left. The battery top hit the ceiling so hard that it damaged it. I was using an old car battery as a power supply for some radio equipment. I had failed to reduce the charge current on an older battery. The amp hour capacity had diminished to a small fraction of what it was when new, but I was still charging 10% of the "new rating". I was probably charging at 100% of the greatly diminished rating. $6000 later I had learned a lesson. I am glad that we were all downstairs when it blew up. It sounded like dynamite. Most of the damage was from the acid. Printed circuits don't like acid dripping onto them. Carpeting tends to fall apart when soaked with acid. Typical email questionIn an email question on one of the BMW motorcycle lists, the statement was made; "My battery voltage was measured after my brief run and again this morning. After the run it was 12.71 volts and this morning it was 12.72V. This indicates to me that it is in the fully charged range of between 12.65 and 12.9. So in my opinion it is not a tired battery and supplies the amps it was rated for." My response; I think that electricity can be confusing and is often misunderstood. Here is a layman's version (mine) of this issue. Here is my analysis of what the two measurements of the earlier email suggests. Since the first resting voltage reading of 12.71 is under the recommended charge voltage of about 14, the test was made after the surface charge had dissipated, that is good. It also suggests, but doesn't prove, that the charge voltage is in the ballpark of 14, that is good. The second reading, that is equal to the first, after some hours at rest, shows that the battery has no drain from the bike wiring, and that is good. It also shows that it doesn't have an internal short, and that is good. We know nothing about the battery capacity. That means that we don't know anything about it's condition because nothing important has been measured. It now needs a load test. If you really want some serious battery info and still in layman's terms, click here. If this article contradicts me, believe this excellent article, not me. Measure the charge voltage1. The charge voltage is the final voltage that is read at the battery terminals while the engine is running. This is really a test of the charging system only. It may take several minutes of charging at 2500 rpm to arrive at a final voltage. It must be measured at the terminals, not at a lug that is fastened to the terminal. True, the two should be the same, but sometimes aren't. A lack of dialectric grease will allow oxygen into the connection and corrosion is the result. Then a voltage drop can occur. Most systems have a voltage regulator that can be adjusted. BMW's up to the solid state can be adjusted and maybe those too. The /5 should read about 14.1 to 14.2 volts. Under 14.0 volts and the battery will be found to be undercharged. Important note; It is commonly accepted that the charge voltage should show 13.8 volts. I went into the testing and servicing of batteries with that number. We found that, for whatever reason, it wasn't enough for the charge voltage measurement to show only 13.8, but just over 14 volts was needed. Later I heard that Ford had the same higher numbers. 2. The resting voltage, is taken after the charge voltage is measured. This is one of the most common voltages measured and the least informative. It varies with battery condition. I must admit that I know little about this resting voltage. From the standpoint of servicing the charging system, we couldn't waste time on it. We set up and adjusted the charge voltage to what we knew would work. Why go back later and check the resting voltage? 3. The voltage under load. This is the voltage measured while the battery is under some stated load for a specified length of time. This is a real test of the batteries capacity. This is frequently called a load test. Sorry, but I don't have the specs for this one. The problem with #2 is that one is probably measuring the surface charge. Any lead acid battery will have a surface charge that can be misleading. We see this, in the extreme, in our cellular telephone transmitter sites. We usually have 4 thousand pounds of batteries for "back up" when the power fails. When the power first fails, the equipment sounds ok for a few minutes and soon starts to "wind down" in sound. After a few minutes the sound (fans) will stabilize. The charge voltage of 27 volts causes the surface charge to also be 27 volts. As soon as the surface charge starts to dissipate, the voltage gradually drops off to 24 volts and will stay there for hours. A good set of batteries will keep us on the air for 6-8 hours. After those hours the voltage starts to drop off and soon it reaches 22 volts and then our protection cuts in to save the batteries and we are off of the air. A worn out set of batteries may only run for less than an hour at 24 volts and then fail. In both cases the charge voltage and surface voltage showed that all is OK. A battery can be so low in capacity and still show full voltage when it is charged. It could be compared to a very small glass (6" high container) that is full of water. It may be full, but has very little stored water. Compare that to a huge reservoir that also is full at 6" deep, but holds thousands of gallons. Our volt meter is the same as the ruler that measured the depth of the water. In both cases the depth is equal, so both containers are full. A battery can be physically "large" and once had a full ability to store electricity, but it's real capacity is diminished to almost nothing. It will still read full voltage. The battery is now a "small" one. Our once "huge reservoir" is now really only a small glass full of water. When the battery capacity drops significantly, say 90%, and we still charge it at the rate for a new battery, we are over charging it. We all know to only charge at 10% of capacity, but what is the capacity for a used battery? It the battery is down to only 10% of it's original capacity, then it is being over charged by 10 times. This makes the battery "hot." The heat can cause the plates to warp. They may warp enough to short out. That is the condition where they tend to explode. If you have never seen a battery explode, then you are lucky indeed. The power available is much larger than I would have expected. The damage or injury can be great. An old battery is to be treated even more carefully than a new one. It is a small stick of dynamite. The new BMW motorcycle battery chargerIt seems that BMW dealers are claiming that BMW has available some new high tech battery charger that is necessary to charge the "so called" gel cell batteries. I have no knowledge of the accuracy of this claim. This is new in late 2003. Jump starting a motorcycle from a carAt first it may seem that a car system is too big to jump a much smaller motorcycle. If you had the largest 12 volt vehicle system in the world, it would be OK to jump the smallest 12 volt system in the world. If the voltages are nearly equal, then there is no problem with the theory. One must protect from an explosion as mentioned above. This is a post from Curt Henry on the Boxerworks forum about jump starting. It is so well done that I just lifted it and pasted it here. Being from the frozen north, we receive a set of jumper cables at birth and are required to carry them to the grave. When hooking up jumper cables ALWAYS CONNECT THE Positive TERMINAL FIRST TO THE positive TERMINALS ON BOTH BATTERIES! THEN HOOK THE NEGATIVE CABLE TO A GOOD GROUND, BUT NOT THE BATTERY!!!!!!! Do not SCREW UP this procedure, a arc could cause one of the batteries to BLOW UP, bad, very bad. After the jumped engine is running disconnect the NEGATIVE JUMPER FIRST FROM THE FROM THE JUMPED VEHICLE, BEING CAREFUL NOT TO TOUCH ANY GROUND, BIG ARC, ALSO VERY BAD. Then remove the positive cable and carefully store your cables until the next time you need them. Car starting story; When I was in school I had a gas powered car starting unit in the back of a Dodge Power Wagon. This unit had 6-12-18 and 24 volt outputs. After jumping myself to get the Dodge running in very cold weather, I would drive the M of U campus looking for those poor souls who car would not start. Stop and offer them a jump for $20, good money in those day. Hook up the cable from the starting unit, 12 volt, a shot of starting fluid and most would start right up. If 12 volts didn't do it, I would jump it up to 18 then 24, not many would not start with spinning over that fast. I am sure that I fried a few alternators and did not do the starter any good, but with luck I would never see any of them again. Kept me in beer for the long dark winters here in Minnesota |
|
This page was last edited:
04/10/2006 - copyright
Duane Ausherman |